
We are curently moving our physical Datacenter network from Cisco Nexus to the OpenSwitch SONiC solution provided by Dell/Broadcom. We manage and administrate our switches through Apstra Juniper.
SONiC: https://www.dell.com/en-us/dt/networking/sonic/index.htm
Apstra Juniper: https://www.juniper.net/us/en/products/network-automation/apstra.html
As we have to physically move the links from the Cisco switches to the Dell SONiC switches, I’ve decided to have a deeper look into the vDS connectivity and improve the actual design.
On this post, I will cover the first step of our network migration. We stay on the current networks, no changes on VLANs and subnets. The routing point/gateway for these networks stay on the L3 Cisco Nexus outside the new Dell/SONiC/Apstra Fabric.
The traffic will go through a L2 PortChannel in place between the Apstra fabric and the Cisco L2/L3 routers when there are extra-Fabric communications.
On this first migration/post:
- The design (vDS, vmk, vlans on trunk links) will already be operational and the performance improved for futur needs.
- We will see how to replace remaining links in “switchmode access” for the benefit of Trunk links.
Trunks allow the addition of future VLANs without having to reconfigure entirely the switchport. - We will remove native VLAN configuration in order to have tagged VLANs only.
- At the end we will use two physical links in Active-Active for all the Distributed Ports Group thanks to the LAG LACP configuration.
- Especially we will migrate the ESXi management, vMotion and vSAN vmk in order to use the uplinks in Active/Active mode.
The new L3 networks/vlans/vxlans will be covered on an other post.
For the L3 part, we will only have to add the new VLANs on the existing trunks.
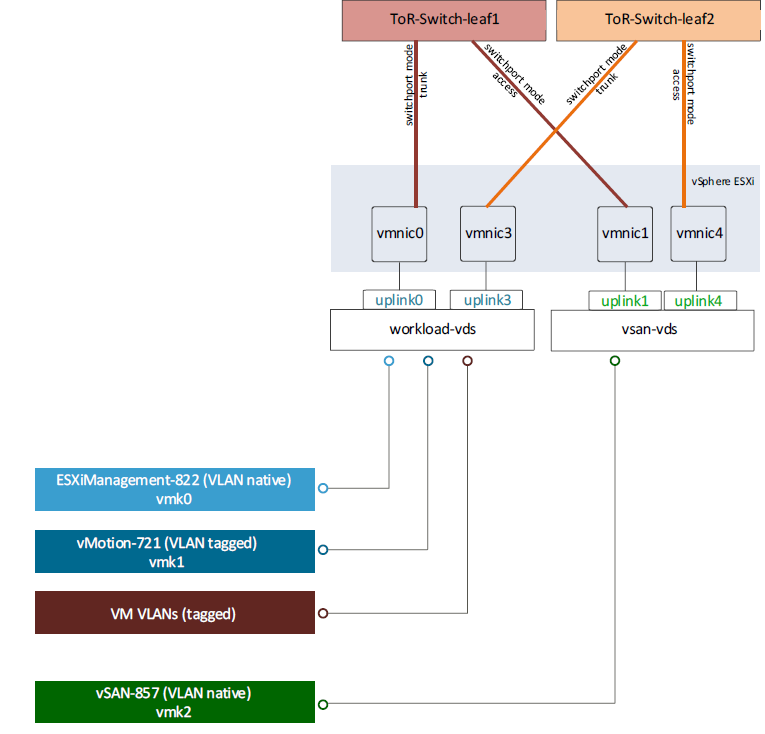
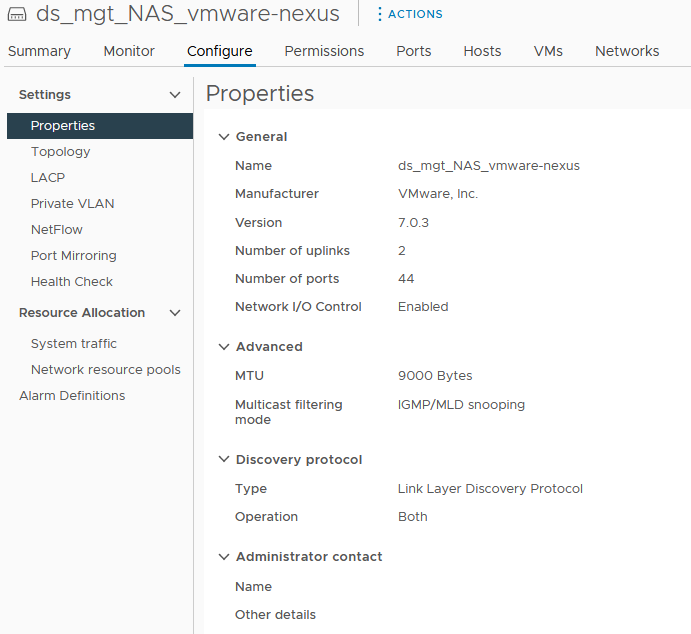
Let’s have a look at our old vDS design:
- We still have switchport in mode access
- We use a seperated uplink for each vmnic
- We use two dedicated interfaces for vSAN (Active/Standby mode)
- We have some portGroups with native VLAN
- ESXi Mgt and vMotion are going through the same interfaces used for the data VMs traffic (not recommanded).
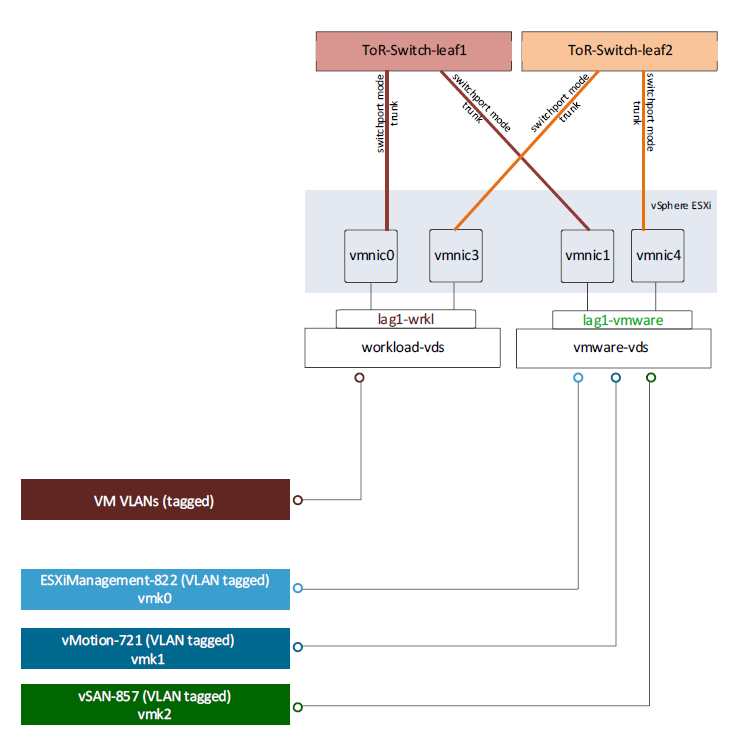
In our new vDS design we will improve the following list:
- We will only use switchport in mode trunk
- We will have a dedicated vDS for all the “VMware” purpuse (ESXi Mgt, vMotion and vSAN).
- All the Data VM traffic goes through one seperated vDS. I’ve called it “Workload”.
- We will have a LAG for each use (VMware and Workload) ->Two links in Active/Active mode.
- All portGroups are using two links in Active/Active mode thanks to the LAG.
- We get rid of the native VLAN.
Before the migration
On Apstra Side
The new ports on the Dell switches are already configured with 4 link without any Po/LACP via Apstra.
- Creation of Connectivity Template (CT) in Apstra. The equivalent of NXOS (Cisco) port-profile.
We have a CT for the workload (Data client vlans) and a vmware CT (vlans for VMware utilities such as vSAN, vMotion, mgt ESXi).
We will see later that these two CTs are represented by two vDS on vSphere.
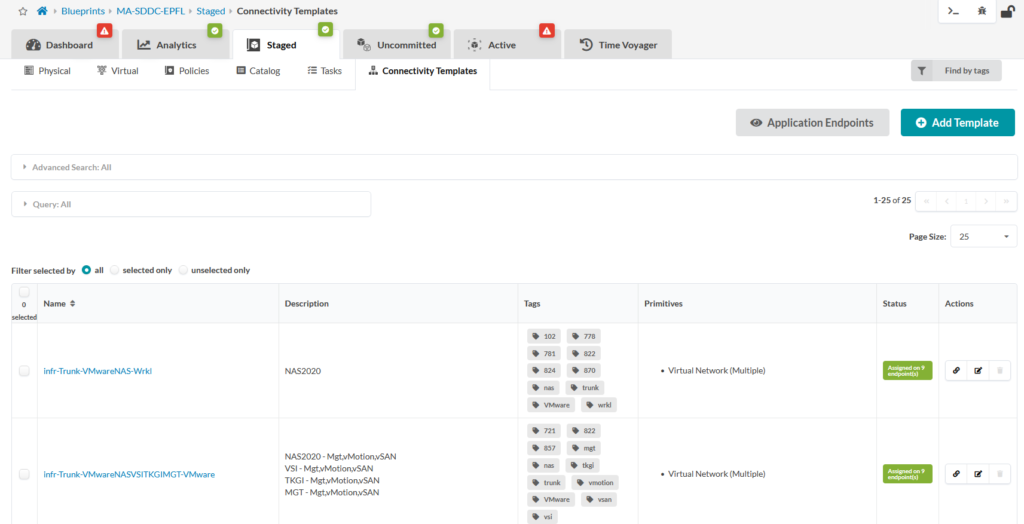
- Apply each of the two CT to both links (2 for the wrkl part and two for the vmware part).
On my case first port of each physical card serves the wrkl part (clients) and the second port of each physical board serves the vmware part (vSAN, ESXi mgt and vMotion).
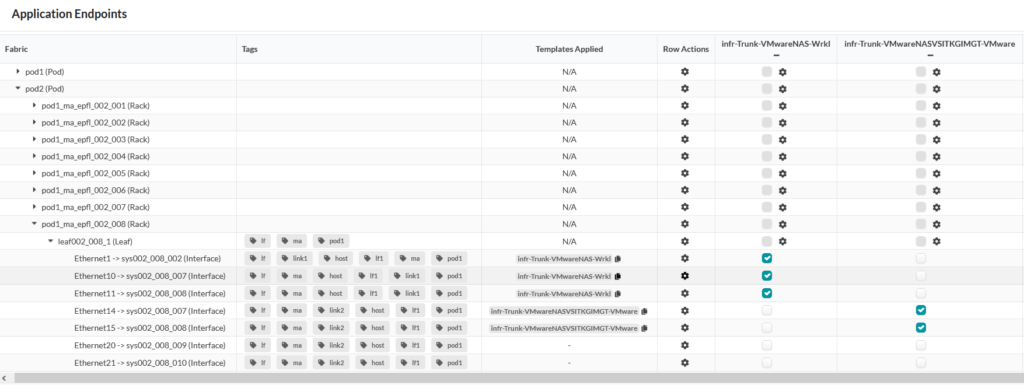
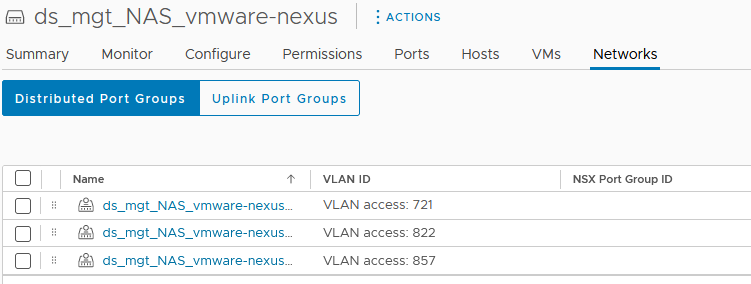
We can see from the switch perspective that on the first interface we have the client VLANs.
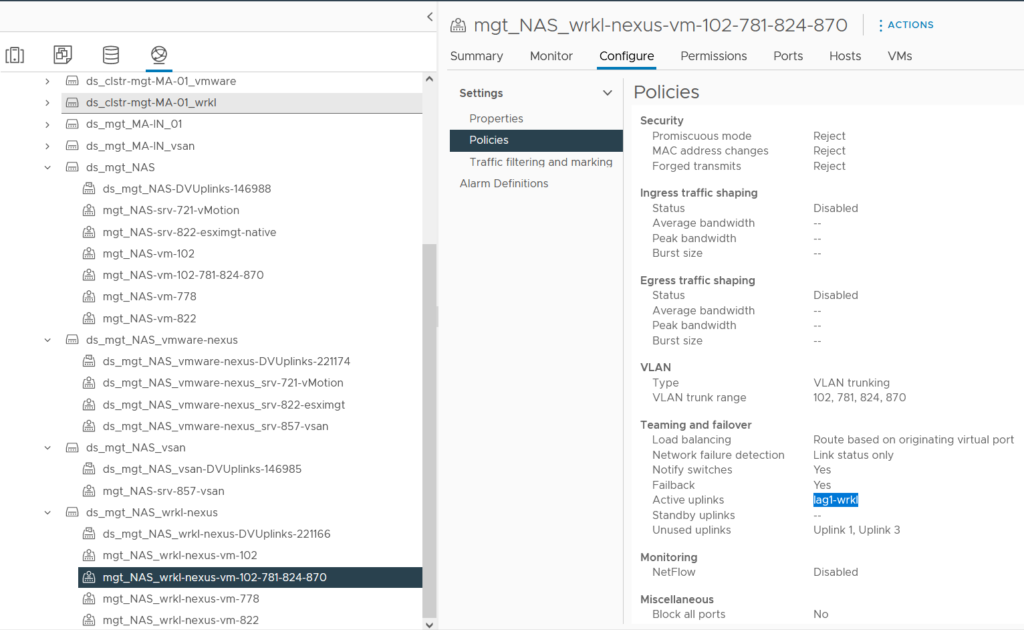
On the second interface we find the ESXi mgt(822), vMotion(721) and vSAN(857) VLANs.
No PortChannel configured.
On vSphere Side
In order to simplify future VMs vMotion, we can upgrade any old vDS to the version of the new vDS without any impacts.
I’ve then created two new vDS (wrkl and vmware), set MTU to 9000 and applied the LLDP discovery on both direction.
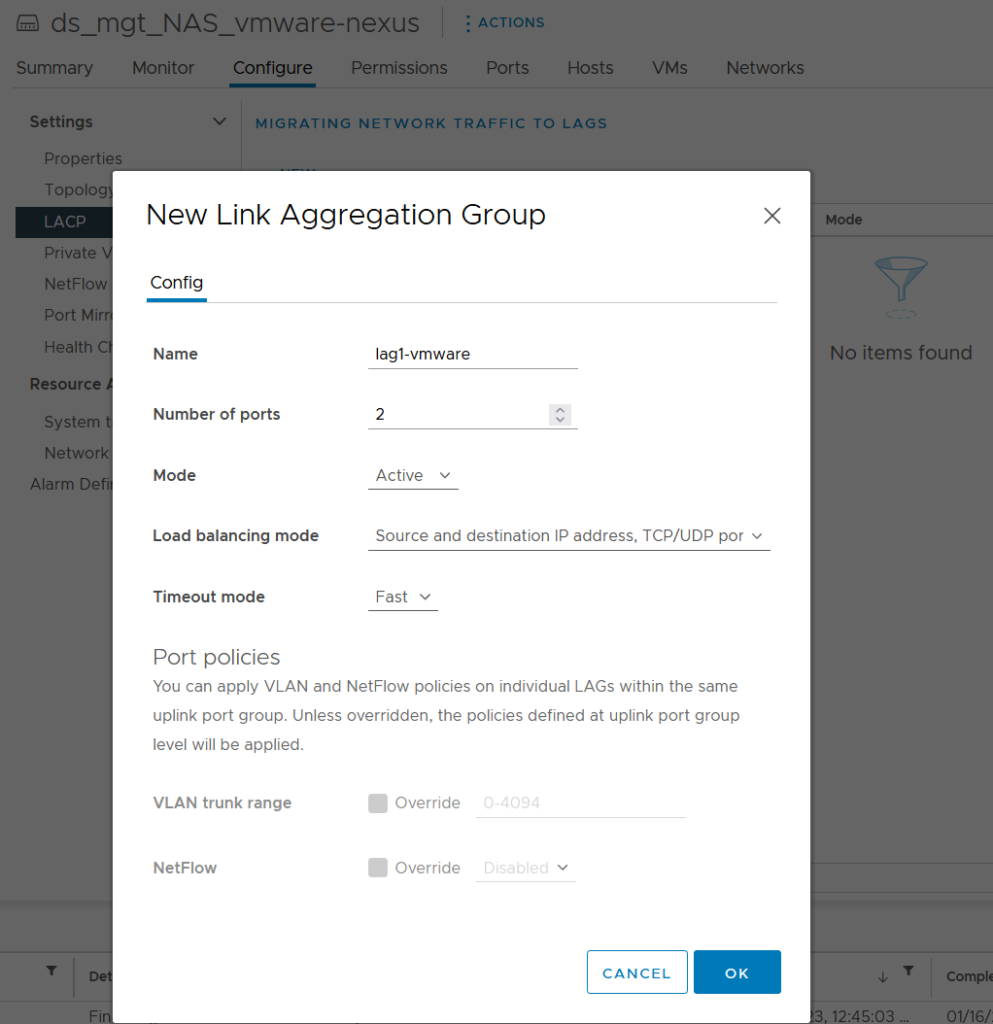
We can now configure the LAGs.
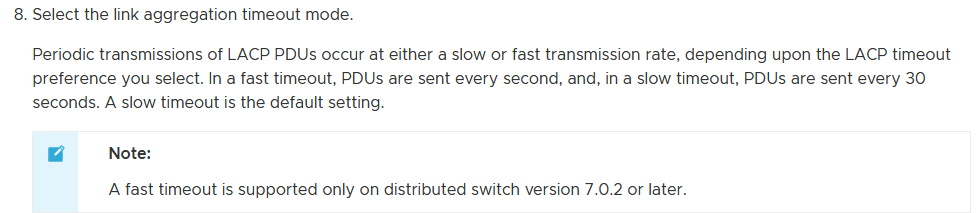
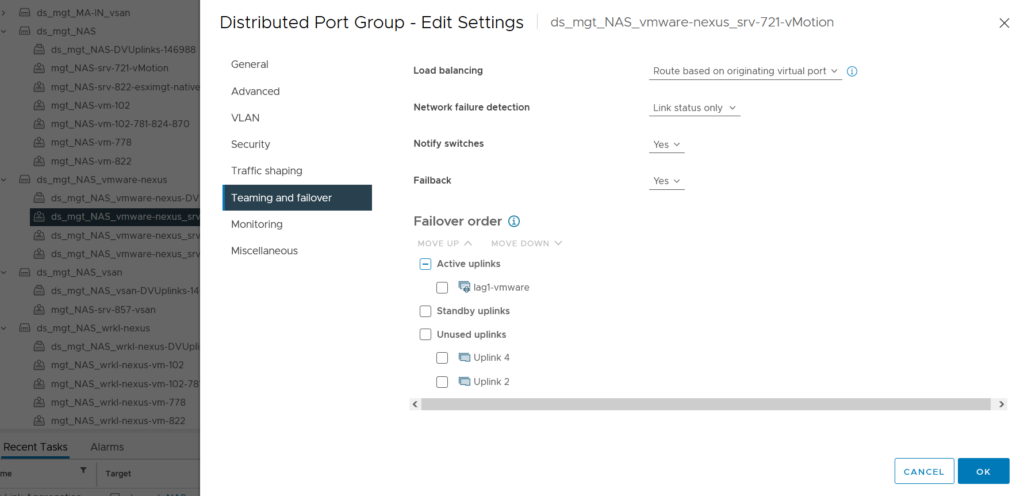
We create the lag on each vDS (lag1-wrkl and lag1-wmware) with 2 uplinks, in active mode and set the timeout mode to fast.
We create the distibuted port groups that use this LAG.
In the vDS “vmware” we have the ESXi Mgt, vMotion and vSAN -> all tagged
In the second vDS “wrkl” we don’t find the ESXi Mgt and vMotion part anymore.
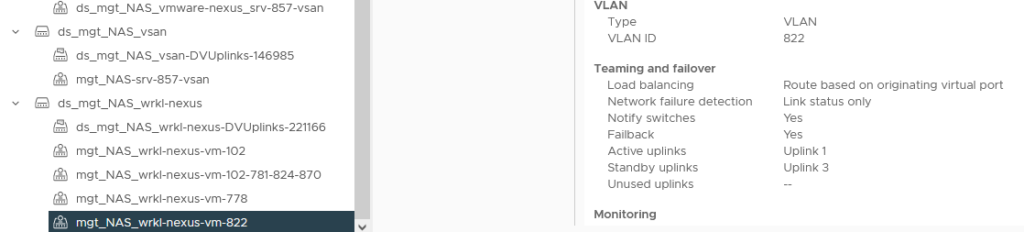
Whether it is for the distributed port group ESXi mgt, vMotion, vSAN (vDS ***-vmware) or for those of the client data VMs (vDS ****-wrkl), we put the LAG created previously as the active uplink and disable any other uplinks.
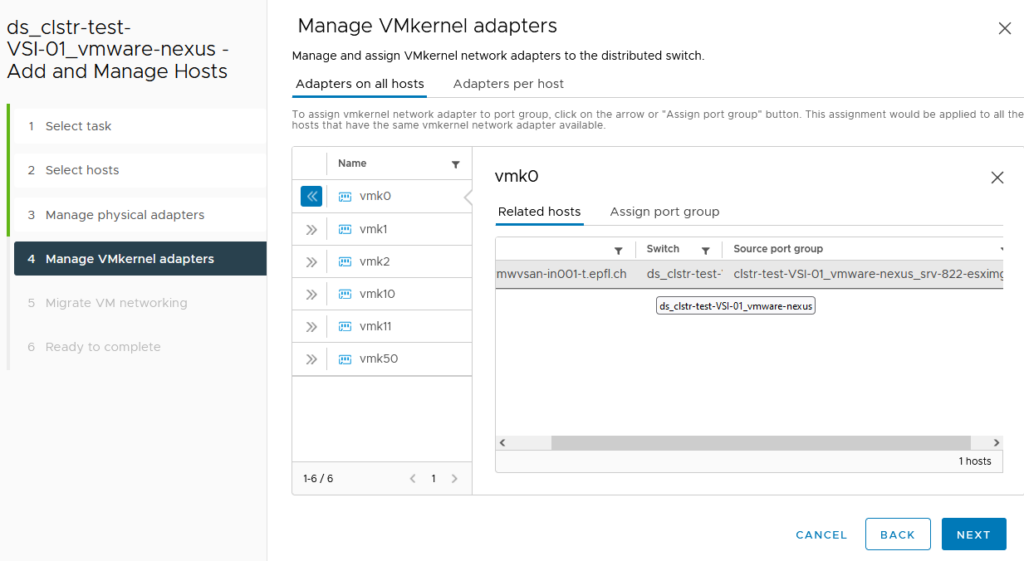
The next step is to add the two new vDS to the hosts (no changes to vmnic and vmk at that time).
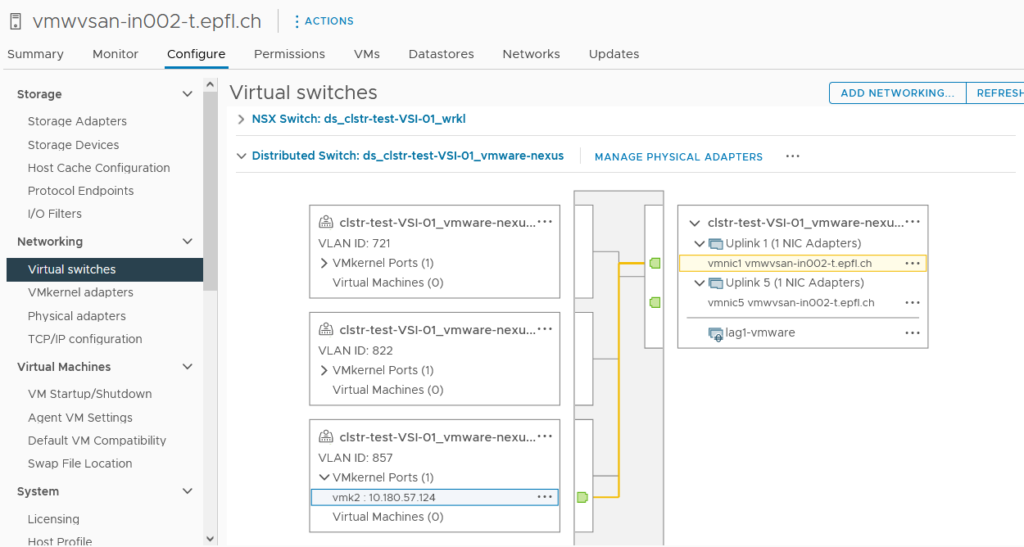
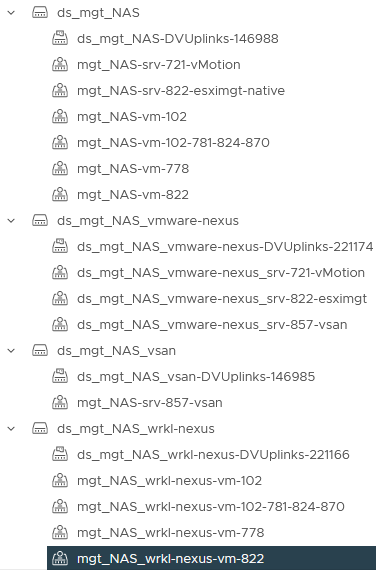
In order to simplify the migration, I’ve created two additional temporary portGroups in the old vSAN vDS (vsan-857-tagging-tmp VLAN 857 + mgt-822-tagging-tmp tagged VLAN 822).
They will be used on the day of the migration.
I could also have provided here a temporary vMotion taggeg (VLAN 721) portGroup.
The day of the migration
Below the step by step procedure I’ve followed in order to migrate to my new vDS design avoiding any workload impact for the client VMs.
- As the physical process may take more than one hour, I’ve first increased the vSAN Object repair timer from 60 min to 360 min.
- Firt of all I first put the server into vSphere maintenance mode.
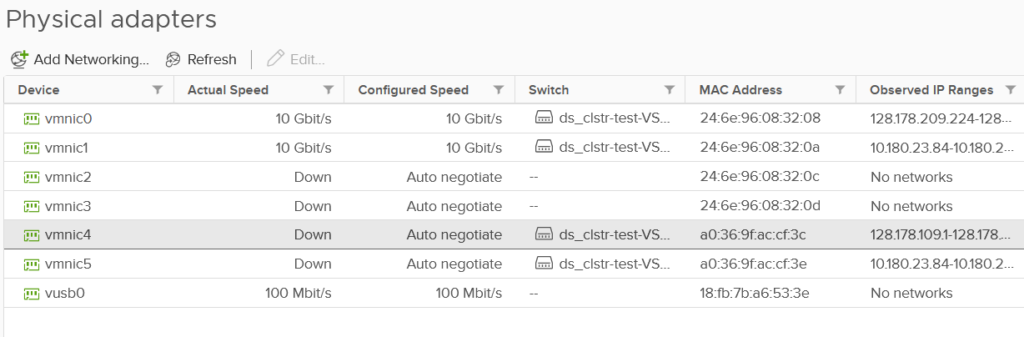
- SSH on the host then shutdown the 2 redundancy interfaces. One after the other.[root@vmwesxi001:~] esxcli network nic down -n vmnic4
[root@vmwesxi001:~] esxcli network nic down -n vmnic5
- Physically remove the network cables from the 2 interfaces that we just shutdown in order to avoid any risk of looping between Cisco and Dell switches.
- From the old vDS unassign the redundancy interfaces (changed to none).
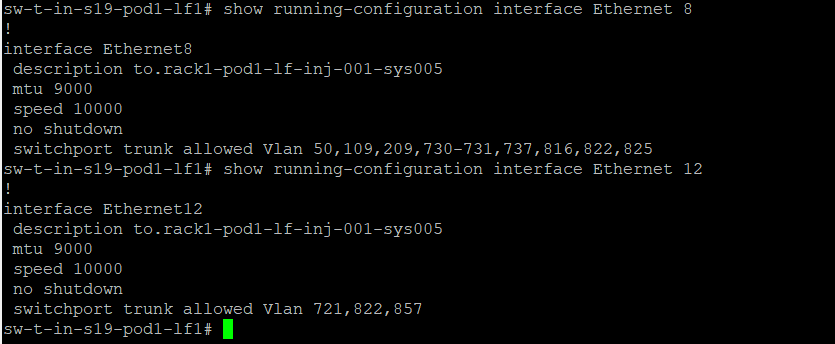
- We will then modify the two vSAN interfaces on Cisco Nexus.
We move from a switchport mode access (vlan native) to a trunk (with VLANs vSAN-857 and ESXiMgt-822).
It would also be possible to add the vMotion directly at that point.
port-profile Node-XXXXXX-vsan-mgt
 switchport mode trunk
 switchport trunk allowed vlan 857,822
 spanning-tree port type edge trunk
 state enabled
 no shutdown
default int ethernet 1/X
int ethernet 1/X
mtu 9216
no logging event port link-status
no logging event port trunk-status
inherit port-profile Node-XXXXXX-vsan-mgt
no shutdown- Migrate vmk0 (mgt) on the temporary vlan tagged 822 -> mgt-822-tagge-tmp.
- Migrate vmk2 (vsan) on the temporary vlan tagged 857 -> vsan-857-tagge-tmp.
- If the server needs to be physically moved, that’s the right moment.
- Connect physically the 4 interfaces to the new Dell switches.
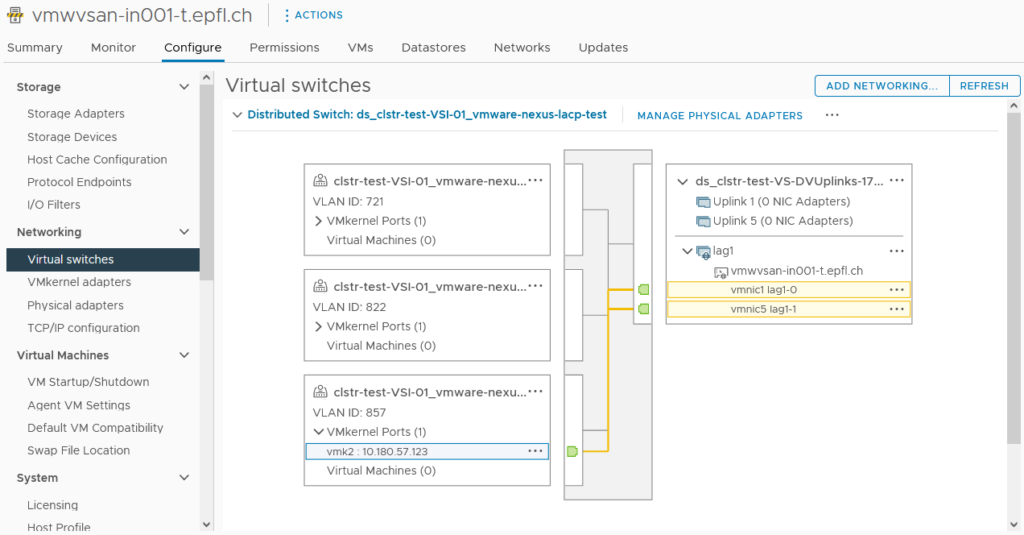
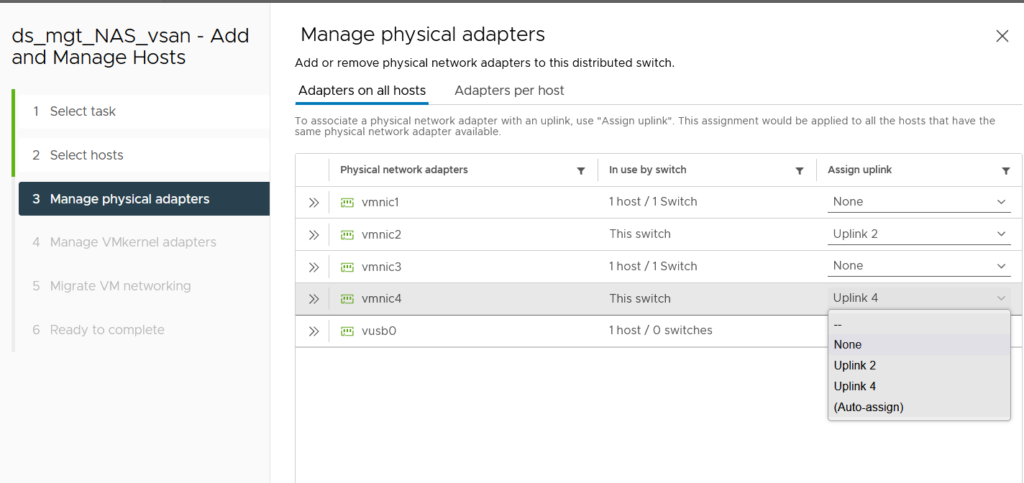
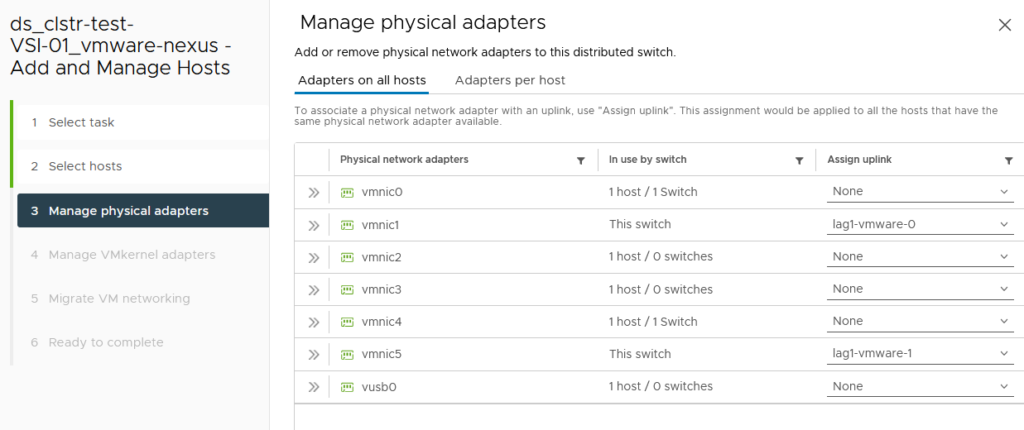
- From the new vDS, add the active uplink interface to use the first uplink of the lag + assign the vmk (esximgt, Vmotion, vSAN) to use the new distributed port group that uses the LAG.
- We also configure the first uplink of the LAG for the “wrkl” vDS.
Here we don’t have any changes on the vmk configuration.

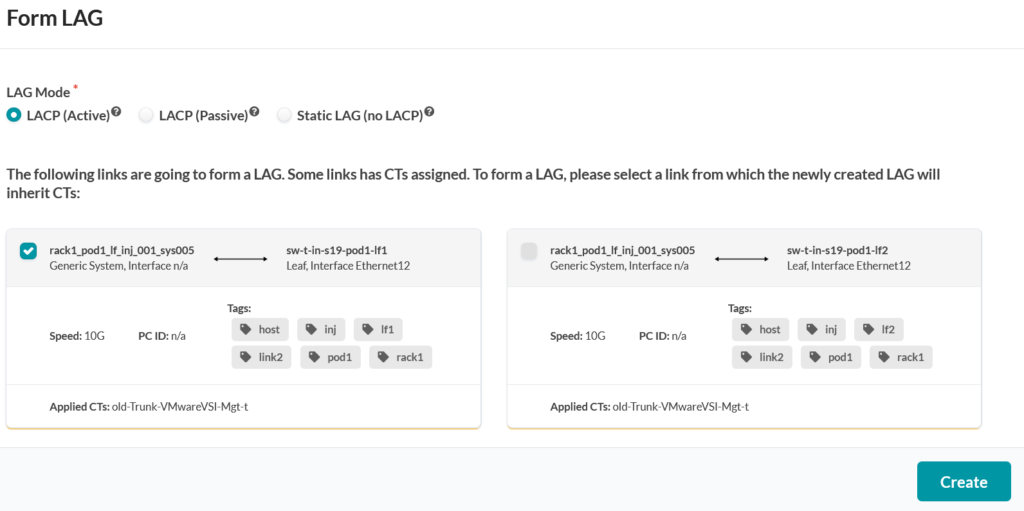
- On Apstra we can now configure the 2 PortChannels (wrkl and vmware).
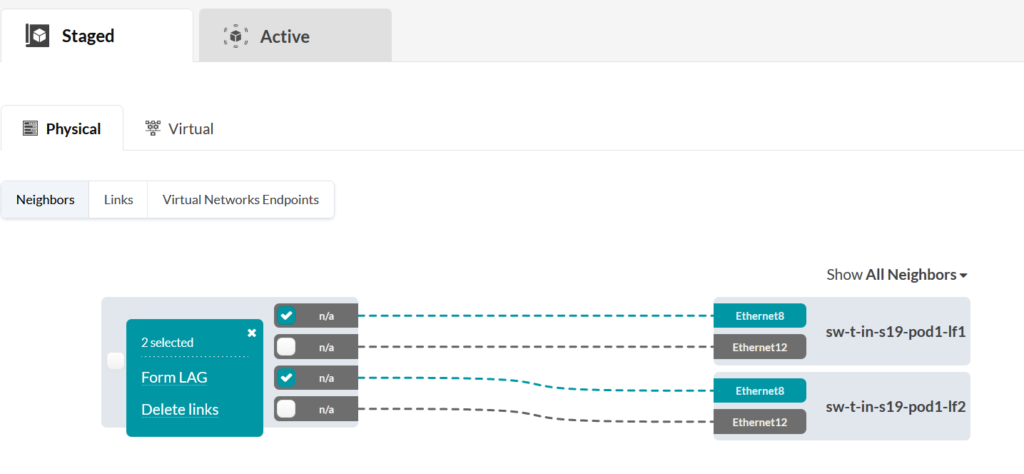
As the four switch interfaces are already configured without LACP, an Apstra Connectivity Template is already applied on them.
Wee can resume the CT assignment for the Po directly at the Po creation.
It is no longer necessary to go into the Connectivity Templates section.
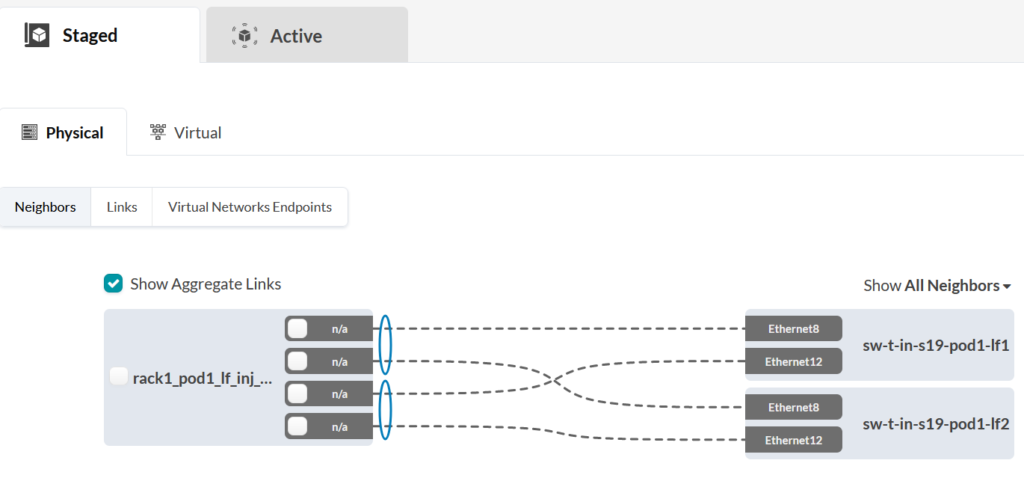
Once the configuration is applied, we have the PortChannels that are created on the switches side and the physical interface is part of this Po.

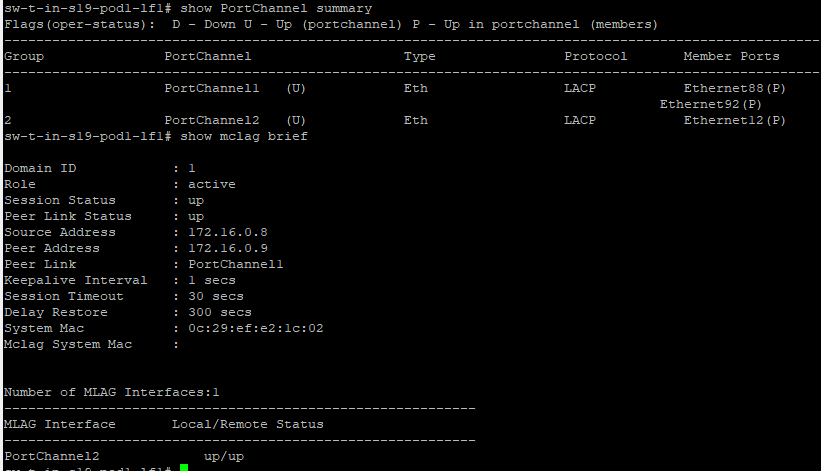
We can see that the interface and the Po are UP on the leaf1.
However as we have not yet configured and activated the second interface on the physical server, we can see that the Po is down on the second switch (leaf2).
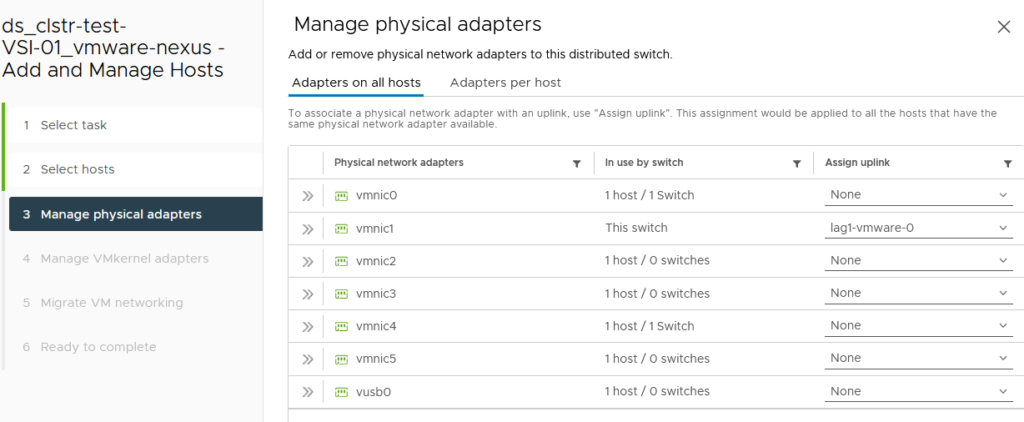
- Add the second LAG-uplink to the redundant vmnic for each of the two vDS.
- Bring the 2 redundant interfaces UP from the ESXi host (ssh), one after the other.
[root@vmwvsan-in001-t:~] esxcli network nic up -n vmnic4
[root@vmwvsan-in001-t:~] esxcli network nic up -n vmnic5
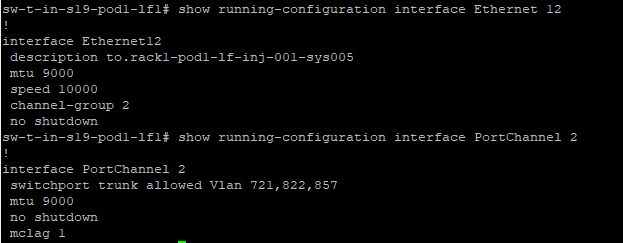
Now that the second interface is UP and configured with the LAG, we can confirm on the switches that the PortChannel is up and consistent.
- Once everything is functional, we can then remove the two old vDS from the host(s) for which the network has been migrated.
- Once all hosts have been migrated, don’t forget to reduce the vSAN Object repair timer from 360 min to 60 min.